Showing posts with label Summer. Show all posts

Saturday, July 6, 2013

Weekly Roundup: Americana Edition

How did you celebrate your Independence Day? We had great fun sharing recipes and crafts here at +Make Your Own this week in honor of the 4th of July! Some of our most popular posts from this week are below!

Patriotic Food

Red, White, and Blue Fruit Skewers

Patriotic Taco Salad

Firecracker Cookies

4th of July Trifle Recipe

Red, White, and Blue Sangria


Patriotic Crafts

DIY Red, White, and Blue Sidewalk Chalk

4th of July Mason Jar Luminaries

DIY Firework Painting

4th of July Table Décor

DIY Paper Fireworks

We hope you're enjoying your summer as much as we are! We're getting closer to that exciting news - it's coming up soon! So stay tuned!

Next week is all about Olive Oil! Come and learn why olive oil is healthy and how you can cook with it, infuse it, and use it in your beauty routines!

Have a fantastic weekend! See you back here next week!
Happy 4th of July!


Sunday, June 30, 2013

Weekly Roundup: Kid Edition

The kids are out of school, and boy did we have a fantastic time rounding up activities and projects to keep them busy this summer! Below are some of our most popular posts from Facebook!

We have a variety of kits to keep kids busy here at +Make Your Own! Check out our selection here!

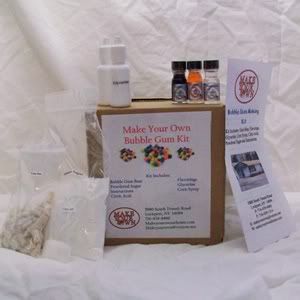
Our most popular kid's kit is the Make Your Own Bubble Gum kit. It's fun and easy to do, providing entertainment for the whole family!


~Keeping Kids Sharp over the Summer


~Activities and Crafts


We also have a Pinterest board that's all about kids! Check it out here and find lots of ideas to keep the kids entertained during the dog days of summer!
 
We hope you enjoyed Kids Week as much as we did here at Make Your Own! Don't forget to follow us on Facebook so you don't miss anything that we post!
 
There is some exciting news coming from Make Your Own soon so stay tuned for that! In the meantime, this week is Americana Week here at Make Your Own! In honor of the Independence Day holiday, we're celebrating with everything Red, White, and Blue!
 
Enjoy your week!


Wednesday, June 26, 2013

It's time for a Scavenger Hunt!

Here at +Make Your Own all this week, we're focusing on kids and keeping them busy and their minds sharp this summer! If you're following us on Facebook then you know what we've shared so far!

Today, I wanted to share with you, a fun summertime activity that you can share with your kids, their friends, neighbors, or family!

Gather the kids around and send them on a Scavenger Hunt. We've taken the guess work out for you and have created a Scavenger Hunt form for you to print and give out to the kids before you send them on their way!

Click the icon to download the form!

 
(If you can't get the file to download, email us and we'll send you a copy!)

This is a great activity to get them out into the neighborhood and exploring their surroundings!

We hope you are enjoying the start of summer and don't forget to follow us on Facebook so you don't miss anything we're sharing!


Wednesday, August 1, 2012

Cherries, Cherries and More Cherries! (and a recipe)


Fresh cherries are in around Western New York! They have been for a while and we've been eating them like crazy! There's nothing better than fresh cherries grown right in your own backyard! Since there was an overabundance in my refrigerator I started toying with a popsicle idea. The end result was absolutely delicious and you can follow my steps below to make your own!

Cherry Lime - Lemonade Popsicles (DIY)

You will need:
~About 5 cups of cherries, pitted
~1 lime
~About 1 cup of lemonade
~Sweetener (optional)

You will also need a good blender or food processor, 3 oz. plastic cups, craft/popsicle sticks, plastic wrap and scissors.

First, get a bag of cherries and pit them. I have to admit, I strongly dislike pitting the cherries! It feels like it takes forever, but we got a new tool in here at Make Your Own just recently that makes the job much easier! It's called a single cherry and olive pitter. It's a handy little device that you can use to push the pits out of cherries effortlessly. The best part is that it's small, so it's easy to store.


There it is! We have them in the store right at the register so grab one the next time you visit. Or you can buy one here.

When I started doing this, I didn't think to actually count how many cherries I had, but my blender was 3/4's full of pitted cherries.


I would say it was probably about 4 or 5 cups of pitted cherries. In reality you could do as little or as many as your blender/food processor will hold. It's totally up to you.

Once the cherries are pitted you add the zest of one lime and the juice of one lime. Somewhere or at sometime in my life I heard a great tip about juicing lemons and limes and it's stuck with me: before cutting a lemon or lime in half to juice it, roll it on the countertop applying gentle pressure. This loosens the pulp and the juice so it's easier to squeeze.

So zest your entire lime right into the blender or food processor. Then roll your lime a few times on the counter, cut it in half and squeeze, cut side up (so the seeds don't escape into your blender) until the lime has given you all of it's juice.


Next, add about a cup of lemonade into your blender or food processor. (This measurement will vary depending upon how many cherries you use - with 5 cups of cherries I used 1 cup of lemonade.)

If you don't like lemonade you could substitute just about any other type of juice. I have seen Cherry Limeade drink mix at several stores. Or, you could just use water.

Blend your ingredients together until smooth.


At this point, you can add sweetener if you'd like. Agave Nectar adds a subtle sweetness that's very smooth. Honey does the same thing. You could also add Stevia or sugar. It's up to you. I did not add any sweeteners to mine. The cherries were sweet enough on their own!

If you are adding sweetener give the blender or food processor another whirl to incorporate the ingredient. Taste test and add more if necessary. Once you're satisfied with the taste, gather several 3 ounce plastic cups and craft/popsicle sticks. You'll also need some plastic wrap.

Start pouring your mixture from the blender or food processor into the cups. You can fill the cups as much or as little as you'd like. I filled mine until they were almost full.


Next, pull off a small length of plastic wrap and cut it in half so you have two small squares. Take one plastic wrap square and place it over one cup. Smooth down the sides until it's tight and attached to the cup. Continue this process until all cups are covered with plastic wrap.

Take your scissors and holding the cup firmly to stretch the plastic wrap across the top, puncture a small hole in the plastic wrap in the middle. Continue with all cups until each has a small hole in the center of the plastic wrap over the middle of the cup.

Then take your craft/popsicle sticks and again, holding the cup firmly to stretch the plastic wrap across the top of the cup, push your craft stick through the hole you made and press until you hit the bottom of the cup with the stick. Continue this with each cup until you have craft sticks in all of your popsicles.

They should look like this:


Now, it's time to put them in the freezer! To keep them upright you can place them in an empty muffin tin. I didn't have room in my freezer for a muffin tin so I just carefully put them in and made sure they were secure before closing the door.

To be on the safe side, I let them freeze overnight and enjoyed one the next day after lunch! What a refreshing treat! I did have a hard time popping the frozen concoction out of the cup so I just used scissors and cut the side of the cup - it popped right out after that.

I hope you enjoy this recipe! Do you have other ideas for popsicles? Share in the comment section below!

News & Announcements

Make Your Own has finally joined Pinterest! We are thoroughly enjoying pinning DIY crafts and projects along with gardening ideas and recipes! Check out  and follow our boards here.

Another great announcement - you now have the ability via our website to subscribe to our newsletters! Stay up to date with specials, sales and invite only events by signing up here. We will never rent, sell or share your information!

Don't forget to follow us on Facebook and Twitter as well!


Friday, June 29, 2012

Hobbies and Holidays

It's hard to believe that Independence Day is almost upon us! Where has the time gone? Soon we'll be talking about Fall and making fruit wines. But let's try to stick to the present rather than worrying about the future.

Will you be participating in the American tradition of grilling this 4th of July?  As of right now, the weather in Western New York is looking a little iffy, but we won't let that stop us.

Now seems to be the perfect time to explore a new hobby, doesn't it? Grilling food is a favorite pastime of Americans, but why not try smoking your meat this summer? I discovered this flavorful spin on grilling a couple of years ago and now, our grill sits in the corner of our garage collecting dust.

There's a popular show on TLC called BBQ Pitmasters that I watch faithfully in the summer months. People all over the United States get together and compete for the grand title and a big cash prize, but that's not why I watch. I watch for the amazing recipes and techniques these people use in smoking.

I think we've smoked just about every cut of meat available in the past two years and each one has turned out amazing with a unique flavor. It can take time to get used to cooking 'low and slow' as the BBQ'ers call it, but the combinations of flavors you can create is just about endless.

One thing we've tried new this year is injecting our meat before smoking it. Holy crow! What a great way to add flavor and tenderness to the meat! We have a great marinade injecting kit available here. I bought this to get us started with injecting and it's worked out great!


If you want to get your toes wet before going out to buy a smoker, you can try the smoker bag, which can be found here. It's a portable and easy way to try out some smoked foods.


We also have cedar grilling planks that work great on the grill and give you a hint of wood flavor. They can be found here.

Do you make your own sausage? If you do, did you know that you can smoke it? It turns out delicious! We have a variety of sausage kits here as well.

There is some great information on BBQ and Grilling here.


Whatever the occasion, we hope you find reason to enjoy the great hobby of grilling and smoking. Stop by and we'll get you going in the right direction! What's on your menu for the 4th of July? Share in the comments below!

Happy 4th of July!!


You can now follow us on Pinterest. Check out our boards for great recipes and DIY ideas!